Monday, June 29, 2015

Three Ways to Get Creative with Bubble Wrap

How have I not yet dedicated a destashing post to bubble wrap?  It's something that a lot of us hang on to, and we plan to incorporate it into our art at some point.  If you have a piece or two (or more) of bubble wrap that you've been meaning to get around to using, this post is for you.  I'll show you three ways to use it.


Supplies: cardstock from Neenah Paper; decorative tape from Scotch/3M; tulle from Wyla; alphabet stickers from Bella Blvd; flair badge from October Afternoon; ribbon from Scrapbook Fantasies; rhinestones from Dee's Place; pen from Zig; ink from Hero Arts; assorted acrylic paints; button from my stash; upcycled tissue paper & bubble wrap.

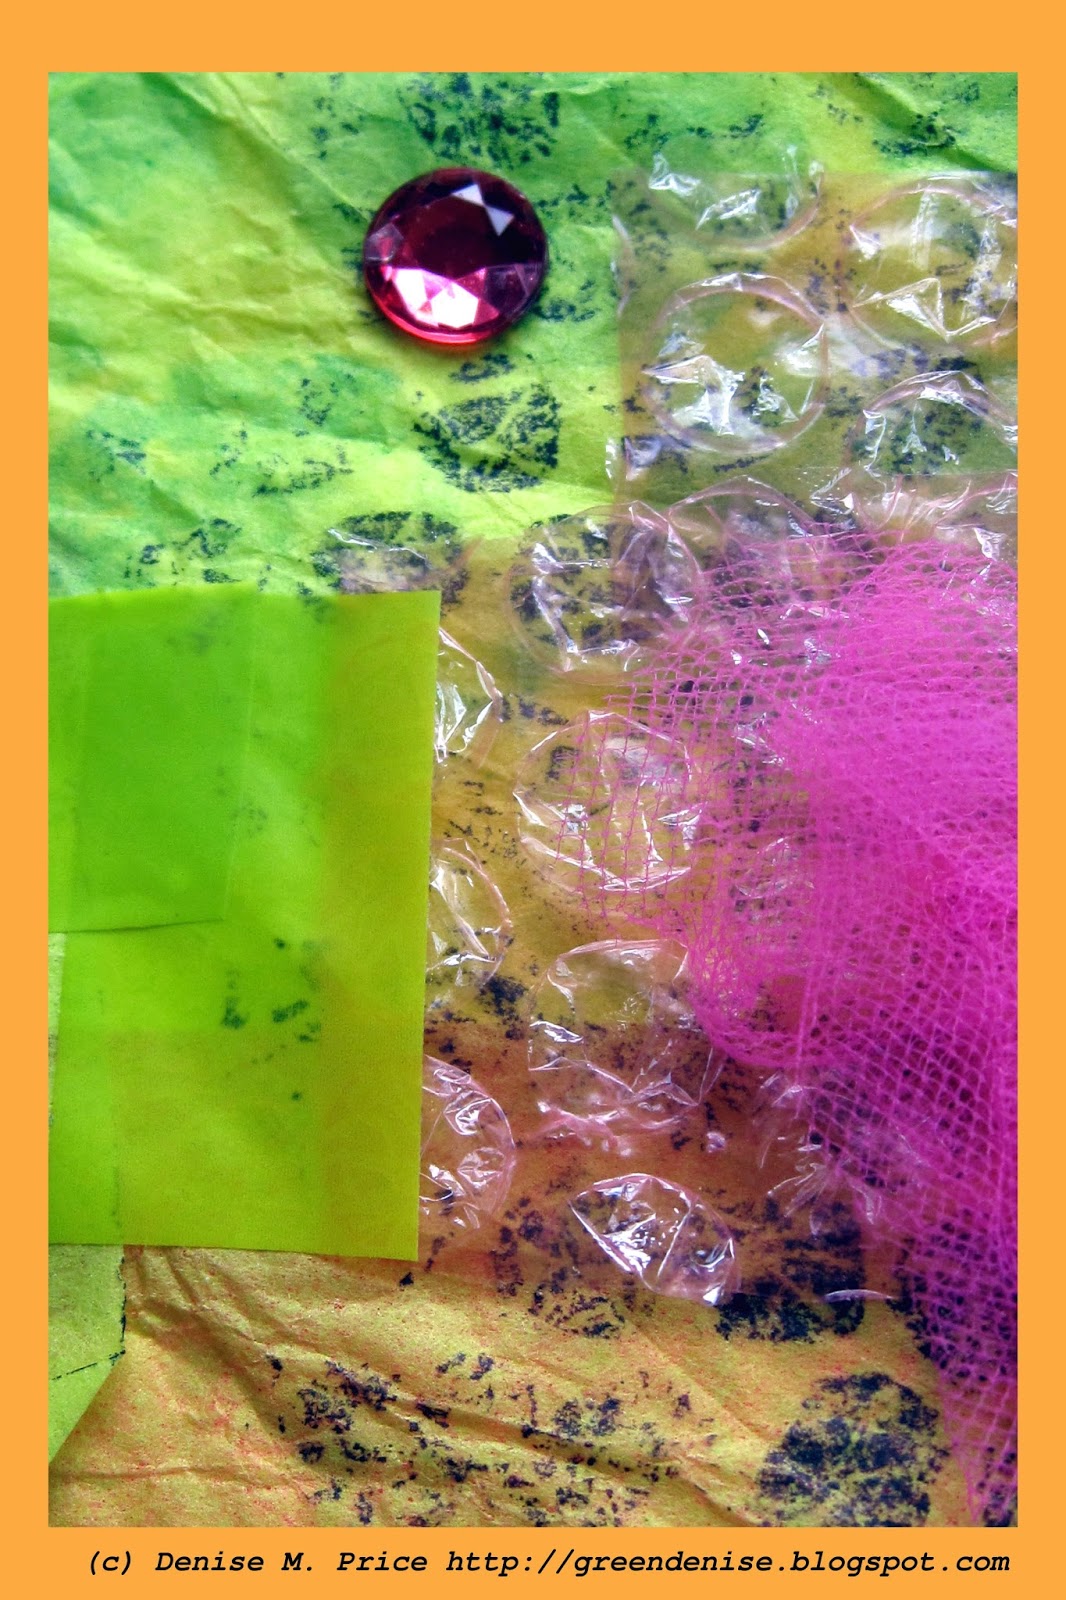
To start out with the basics, you can use bubble wrap as a stamp with a regular ink pad.


Then, you can take bubble wrap stamping to the next level by stamping with acrylic paint.  Using a mix of colors (I used green and white here) creates an interesting marbled effect.


Finally, to add playful texture to your work, you can use bits of bubble wrap as layers and embellishments, as I have done with this pretty pink bubble wrap.  (Wondering where to get pink bubble wrap?  Electronics come packaged in it; the pink color indicates that it has anti-static properties.)


And...that's a wrap.  (Oooh, bad pun.  *Smile & groan.*)

Saturday, June 27, 2015

Summer of Color Week 3: Mini Album Page

Yikes, the color palette this week for the Summer of Color is tough: two shades of purple plus one shade of yellow.  Well, last weekend a friend gave me a pack of yellow Prima flowers, so I thought I could do something with those.  And then I remembered that I have an unfinished mini album with some floral stamping and yellow paint in the background of one page.  So I decided to finish that page, and this is how it turned out:
 
Supplies: upcycled cardboard, napkin, bubble wrap, & Easter card; lavender paper from Graphic 45; number paper from My Mind's Eye; alphabet stickers from Basic Grey; flower from Prima; enamel dot from October Afternoon; stamping ink from Hero Arts; assorted acrylic paints.

This mini album documents a trip that my family and I took to Silverwood Park in 2013.  Silverwood Park is dedicated to celebrating the arts, so there is poetry posted on signs along the walking trails there.  There are also signs with phone numbers to call (and QR codes to snap) in order to hear poetry read aloud.  I just checked, and you can still hear a poem if you call the number on the sign in my photo.  Or, for a shorter poem, you can read the posted piece in the photo below.


This arts-centered park was fun to visit, and I took a lot of photos there.  I really had too many photos for a scrapbook page, so I decided to make a mini album.  I started this mini album last year.  I had gotten as far as doing the mixed media backgrounds for the pages, but then I ran out of steam.  It turns out that this Summer of Color palette was just the push that I needed to get back to the album.  In addition to completing this page, I went ahead and finshed the rest of the album, too.  This blog entry focuses on the one page that is my Summer of Color project, but I'll show the completed album in another post at another time.  Bye for now!  

Monday, June 22, 2015

Summer Plans


It has felt like summer for awhile now here, but the calendar officially ticked over to summer (for northern hemisphere folks) on Sunday.  I am really enjoying being outside in the sunshine.  One fun thing that I recently did was have tea at an outdoor cafe with a friend.  She had black tea and a shortbread cookie.  I had white tea and a lemon cake.  Lately I love all things lemon.  And all things lemony yellow, too.  And speaking of summer and yellow makes me think of this scrapbook page that I made awhile ago but never shared on my blog (until now).

Supplies: paper & stickers from October Afternoon; button from Blumenthal Lansing; twine from Canvas Corp.; pens from Zig.

The story behind this layout starts last summer.  I got the program brochure from my local library and asked my son to look through it and tell me if he found any interesting programs we could attend.  However, the page that caught his interest was not a program description, but the map at the back of the brochure.  The map shows all the different library branch locations throughout the county.  "I want to go to all of them!" my son said.  We didn't make it to all forty-one locations, but, over the course of the summer, we actually made it to twenty.  It was quite an adventure.  Here are a few detail shots...


I cut that cute hot air balloon out of an 8x8" paper pad.  The pad also provided fun papers for photo mats.


My son and I kept track of the libraries we visited by highlighting the locations on the map.  I took a photo of the map (with the highlighter resting on top of it), printed the photo on my color printer, and used the printout as a journaling spot on the page.


Like I said, we visited twenty out of the forty-one libraries last summer.  Can you guess what my son wants to do this summer?  If you guessed that he wants to visit the remaining twenty-one libraries, you are correct.  We're on our way to that goal, having visited several more already.  


Now you know what I'm up to these days.  What are you doing this summer (or winter, if you're in the southern hemisphere)?  Let me know in the comments.  And if your adventures involve tea or any other beverage, why not link up with Elizabeth and Bleubeard's virtual tea party?  Enjoy!

Thursday, June 18, 2015

#TBT Last Year at this Time...

This is my first time posting for Throwback Thursday (#TBT) on my blog.  I was just thinking about what a rainy June we had last year.  There was so much rain that water seeped into our basement and pooled on the floor.  Luckily, we have an unfinished basement with a concrete floor, so the damage was minimal.  But obviously we couldn't have water just sitting on the floor.  So, we got a sump pump.  And I love it.  Not for its looks, but for what it can do to prevent our basement from ever flooding again.
 
Supplies: cardstock from Bazzill; patterned paper, stickers, & enamel shapes from October Afternoon; notebook paper from Cachet; doilies from Celebrate It; pen from Foray; ink from Tsukineko; household mechanical pencil & mini calendar page.
 

I love the sump pump so much that I scrapbooked a photo of it on the June month-in-review page of my 2014 album.  And I even used the shabby-chic style, just to show my love...the scrapbook page is kind of like a frilly Valentine card to my sump pump.  In fact, the big doily in the background is actually made of eight little heart-shaped doilies.  I realize that my love for the sump pump is a bit silly, yet I just can't help it.  And that makes me smile.  I hope this scrapbook page makes you smile, too.  May your June weather be pleasant and your basement (if you have one) stay dry.  :)

Wednesday, June 17, 2015

Summer of Color Week 2: Easy-Breezy Card

I am continuing to create with the weekly color palettes from Summer of Color.  I made a card again this week, but my approach was different this time.  For Week One, I splashed around with watercolor paints.  This week, however, I embraced a simpler, much more orderly look. 
 
Supplies: cardstock from Neenah Paper; patterned paper from Jillibean Soup; cut-apart paper from October Afternoon; ribbon from Scrapbook Fantasies; glitter from Ranger; pen from Zig.

The color prompt for this week is 1 pink + 1 pink + 1 orange.  I have a sister-in-law who adores the color pink, so this card is for her.


For the most part, the lines of this card are straight and orderly.  But, to add just a touch of contrast, I swiped on a little bit of pink glitter.  You can see it better in this detail photo than in the main photo.  Hope you like the card!  Thanks for stopping by my blog today.

Saturday, June 13, 2015

Summer of Color Week 1: Birthday Tag/Bookmark

It's summer, hooray!  And that means it's time for the Summer of Color.  For week one, the color prompt is 1 blue + 1 blue + green.  To get started, I opened a watercolor set and chose three colors: sky blue, indigo blue, and apple green.  I've approximated these three colors in the borders that I've added to my photos.
 
Supplies: patterned paper from DCWV; watercolor paints from Angora; pen from Zig; washi tape (used for masking) from 3M/Scotch; ribbon from Scrapbook Fantasies; puffy sticker & sequin from my stash.

To create the stripes, I simply masked areas with washi tape.  (The grid lines in the background paper made it easy to keep the tape straight.)  As I painted, I let the colors run together.  This always creates such a pretty effect with watercolors.  I love the contrast between the crisply masked lines and the blurred, flowing paint.


This is quite a large tag.  After I took these photos, I wrote a birthday greeting on the white (masked) lines, and then I taped it to my friend's birthday gift.  This particular friend loves to read, so I figure she can use the tag as a bookmark in the future.


As a finishing touch, I added a bit of shine--a sky blue sequin and an indigo puffy heart.  I also doodled around the borders and tied a ribbon through the hole of the tag.  And now...I'm off to see what everyone else has been creating for the Summer of Color.  I'm sure it will be interesting, as it is every year.

Tuesday, June 9, 2015

Northwoods Summer

Hello!  I was recently looking back at my college photos (from the 1990's), and I decided to scrapbook some of them.  Here is a page dedicated to a northwoods vacation that I took with my family during the summer between my first and second year of college.
 
Supplies: background paper from Sugar Tree; lattice patterned paper & enamel shapes from October Afternoon; kraft notebook paper from Cachet; cardstock from Bazzill; die cut from Elle's Studio; alphabet stickers from Bo Bunny; pen from Foray; household mini stapler & staples.

I'm playing along with T is for Tuesday, so let's have a cup of tea while I walk you through the page.


My tea cup this week has a northwoods vibe, to go along with the layout.  The cup was handmade by a talented artist in Wisconsin.  Even though it looks like a birch trunk, it's ceramic.


Awhile back, I noticed that a trait of some of my favorite scrapbook pages is a mixture of hard and soft textures.  Ever since I came to this realization, I have made an effort to incorporate a variety of textures into my work.  On this particular page, crumpled and distressed layers of paper provide the softness.


Metal staples, placed in a row, provide contrasting texture.


The photos on this page are from before I ever had (or had even heard of) a digital camera, but they are still some of my favorite photos.  This one shows my brother, my mom, and me on a footbridge in Itasca State Park (the source of the Mississippi River).  My dad took the photo, and I love how he captured the reflection in the water.  


Well, that's all for today.  I hope you've enjoyed going "up north" and "down memory lane" with me in this post!  :)

Friday, June 5, 2015

Cute Tape Idea

Hi, all!  This is just a quick post.  It's the end of the school year, so I was writing out teacher thank you notes yesterday.  To decorate the plain white envelopes, I used five kinds of decorative tape.  On some of the envelopes I placed the bits of tape in a straight line.  On other envelopes I offset the tape bits. 

All decorative tape by Scotch/3M.

I'm sure I'm not the first person in the world who has had this idea, but I still thought it turned out cute, and I wanted to share it, because cuteness is worth sharing.  Can you envision a scrapbook layout with page borders made of bits of tape arranged like this?  I think that would look good.  Well, I know what my next project will be.  :)